Tips and a step-by-step procedure with photo support for removing the engine on a VAZ 2110 car. Tips and a step-by-step procedure with photo support for removing the engine on a VAZ 2110 car.

Following the recommendations of the manufacturer, for the necessary technical repairs, the power unit, that is, the engine with a clutch and a gearbox, should be removed downward, but in a garage it is more convenient to carry out the same process upward with the obligatory use of a lifting device, having previously removed the gearbox. All work must be performed only in the presence of an assistant.
Removing the VAZ 2110 engine, the procedure for work in stages:
1. First, you need to remove the battery from the car.
2. The next step is to remove the hood.
3. After that, remove the oil from the engine crankcase by unscrewing the drain plug, and the coolant from the cooling system by unscrewing the drain plugs of the cylinder block and radiator with the expansion tank cap removed.
4. Now it is necessary to remove the air filter with the hose of the inlet pipe, not forgetting to close the carburetor from above with the technological cover.
5. Then we take and disconnect the intake pipe with the bracket from the engine, slightly lower it down so that the flange can come off the studs of the intake valve.

6. The next movement is enough to turn the throttle valve drive sector to the stop torque.
7. After that, it is necessary to unscrew the two bolts securing the bracket for the throttle actuator rod and take it aside, without disconnecting the rods from it, but so that it does not interfere with further work.
8. Further, having unscrewed the fastening nut, carefully remove the tip of the "mass" motor wire from the stud.

9. Finally, loosen the next two fastening nuts and remove the lugs of the "bulk" wires from the studs securing the rear cover of the cylinder head.
10. Disconnect carefully the block with wires from the coolant temperature sensor by slightly squeezing the clamp.

11. Then gradually loosen the tightening of the clamps and remove the radiator outlet hose from the thermostat and the radiator inlet hose from the cooling jacket branch pipe.
12. Now we disconnect the wire from the coolant temperature gauge sensor.

13. We slightly loosen the clamp and remove the heater supply hose from the pipe of the water cooling jacket.
14. With the next effort it is necessary to disconnect the block (No. 1 in the figure above) with the wires from the sensor (No. 2 in the figure) of the detonation (or remove the sensor, but for this, unscrew the nut of its fastening and remove the sensor from the stud, but leaving it on wiring harness).

15. Now it is important to disconnect the block with wires from the low-voltage terminal of the ignition module by pressing the latch holding it.
16. Then carefully disconnect the block with wires from the terminal "D" of the generator, carefully move the rubber cover and unscrew the nut to then disconnect the wires from the contact bolt (terminal "B +") of the generator.

17. Just disconnect the block with wires from the adsorber by pressing the retaining plastic latch. 18. Now you need to remove the wire from the oil pressure warning lamp sensor.

19. Then, finally, loosen the clamp and disconnect the vacuum booster hose from the receiver connection.
20. The next step is to disconnect the vacuum hose of the electro-pneumatic valve from the receiver connection.

21. Pressing the retaining latch, carefully disconnect the block with wires from the idle speed regulator installed on the throttle pipe.
22. Loosen the clamp and remove the adsorber purge hose from the throttle fitting.

23. Now, simply disconnect the block with wires from the throttle position sensor by pressing the latch.
24. Unscrew the fastening nuts, controlling the hoses against twisting with a second wrench, then disconnect the fuel supply "1" and fuel drain "2" hoses from the fuel pipes (the fuel supply hose is marked with paint).
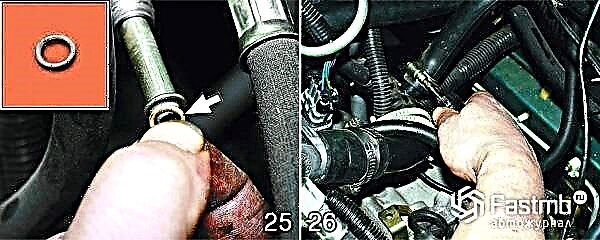
25. Be sure to pay your attention to such a detail that there are O-rings in the fuel pipes and it is imperative to remove the ring after disconnecting the hose and, if necessary (torn or slightly stretched), replace it.
26. Now we remove the heater outlet hose from the supply pipe of the water pump.

27. Pressing out the retaining plastic latch, disconnect the block of the injector harness.
28. Try to unfasten the clamp (cut if necessary) securing the wiring harness to the water pump inlet pipe.

29. From the bottom of the car, carefully disconnect the block with wires from the sensor 1 of the oil level in the engine crankcase (next to the oil filter 2).
30. Take and disconnect the block with wires from the crankshaft position sensor.

31. Having gradually unscrewed two bolts securing the cover, we remove two holders with wires from the front cover of the camshaft drive belt.
32. The next point is to get the wiring harness from under the receiver.

33. After removing the wiring harness from under the thermostat, it is important to finally make sure that all wires and hoses are disconnected from the engine.
34. Having loosened the tightening of the adsorber clamp bolt and removing it from the clamp, we remove the adsorber aside (but without disconnecting the hoses from it) so that it would not be a serious hindrance when removing the engine.

35. Loosen the nut of the gearbox housing, under which the eye is installed, then remove it from the stud.
36. It is necessary to precisely install the eyelet under the upper bolt of the ignition module of the VAZ 2110 car.

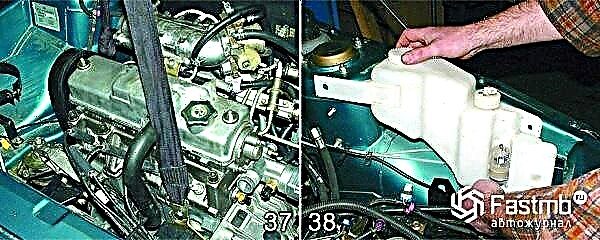
37. Next, we hang out the engine by carefully hooking the cable onto the two eyelets and pulling it tightly with a hoist or crane.
38. In the absence of a crane or hoist, it is important to additionally remove the washer reservoir.

39. After that, you should install a suitable board on the front fenders, placing soft pads under its ends so as not to damage the paintwork.
40. Tie the removable VAZ 2110 engine tightly to it by the eyelets installed on the cylinder head and the gearbox, using cables or ropes that must be tightly tightened.
41. It is necessary to remove the gearbox.

42. Remove the two bolts securing the front suspension support of the power unit.
43. Lift the engine up and fix it on strong stable supports so that the engine does not touch the flywheel and generator drive pulley.
44. The process of installing the engine of a VAZ 2110 car occurs in the reverse order of the removal process, exactly according to the points indicated. After the repairs have been carried out and the engine has been moved to its workplace, it is necessary to pour oil into the crankcase of the engine, and coolant into the cooling system.